15. APPENDICES
Appendix A. MEC application by a healthcare professional
A1. Preparations
| Intervention | Rationale |
| Wash your hands before (and after) the application and use gloves. | To prevent cross contamination. |
Gather the equipment: • MEC • drainage bag (leg or bed) with tubing • water, soap, wash cloth, towel • scissors if needed | To ensure that the application process proceeds without any disturbance. |
| Explain the procedure to the patient. | To gain consent and co-operation and to ensure the patient understands the procedure. |
| Read the manufacturer’s instructions before applying a MEC with special features. | To ensure patient safety. |
| Wash the penis with soap and water | To ensure adhesion of the MEC. |
| Do not use re-hydrating soap as it may cause the adhesive to fail. If that is the only cleanser available do not put on a new MEC directly. | |
| Rinse and dry. | |
Wait 5 to 10 minutes Wait for at least 15-20 minutes after a bath or shower before application. | |
| Inspect the penis to make sure it does not have any broken or reddened skin. | To determine if a MEC can safely be used. |
| Trim the hair on the penis and its base. | The hair will not stick when the adhesive is applied. |
| Protective cloth placed over the base of the penis. | Can also assist in preventing hair from getting caught in the adhesive. |
| Another tip to keep the hair out of the way and to get a clean dry field around the base of the penis is to tear a small hole in the centre of a paper towel and then slip this over the penis to the base. [44] | |
| Roll out the MEC as specified by the manufacturer’s instructions before rolling over the penis. [62] |  Fig. 46. Roll out the MEC |
| If the patient is not circumcised, hold on to the foreskin when you put on the MEC. | Pulls forward the retracted penis and makes it easier to apply the MEC Keeps the foreskin in the right place. |
| Leave 2-3 cm space between the tip of the penis and the end of the MEC. | More than 2-3 cm might promote catheter twisting and restrict the urine flow. |
| It is preferable if the penis is erect, but it is not absolutely necessary. If no erection is present, stretch the penis slightly by pulling. | It is easier to put the MEC over the penis. |
A2. Procedure for applying MEC with adhesives
| Intervention | Rationale |
| Check patient’s records for allergies. If there is a possibility that the patient may be allergic to the MEC material or adhesive, do a skin test on a small area of skin before applying. | To prevent an allergic reaction in the patient. |
| Self-adhesive MEC | |
Stretch the penis gently as you roll on the MEC. When the MEC is unrolled, press it against the penis so that it adheres. No other glue or adhesive strip is needed. | 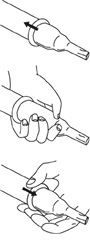 Fig. 47.a, b, c. Press the MEC against the penis |
 Fig. 48. Self-adhesive MEC with a help stripe to roll on the MEC (Source: Coloplast)
| |
| MEC with tape strip | |
| The tape strip is adhesive on both sides. A band of adhesive 2-3 cm wide is preferred. | To achieve the best adhesion of the MEC. |
| Apply the adhesive double-sided tape in a spiral overlapping fashion around the base of the penis. | 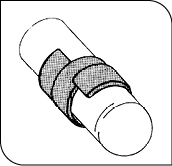 Fig. 49. Spiral overlapping of the tape stripe (Source: Manfred Sauer GmbH) |
| Do not stretch the strip. | Make sure it is not too tight. |
| Roll on the MEC over the tape and press to attach. | To achieve the best adhesion of the MEC. |
| In the case of hydro-colloid tape, it is recommended that pressure is applied with the hands for about 30 seconds. | The warmth of the fingers will increase the adhesive strength. Fig. 50 Apply pressure on the MEC 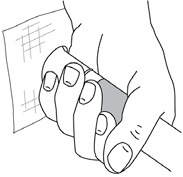 |
| MEC with liquid adhesive | |
| Apply the adhesive, in small quantities, in a ring on the middle of the penis shaft. Do not put adhesive on any skin defects. | To ensure the adhesion process is successful. |
| Spread the adhesive well and uniformly. | |
| Unroll the MEC over the adhesive. | To achieve adhesion of the MEC to the skin. |
| Do not wait too long before applying the MEC. | Or the glue may dry. |
| Press tightly on the MEC. |  Fig. 51. Application in 4 steps (Source: Manfred Sauer GmbH) |

A3. Procedure for connecting the drainage bag
| Connect the drainage bag with tube to the connector tip. | To allow continent urine drainage into the urinary bag. |
| Make sure the system is free of twists and kinks. | |
| When attaching a leg bag, adjust the length of the inlet tube, before connecting the MEC to the leg bag. |  Fig. 52. Adjusting the length of the inlet tube 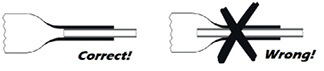 Fig. 53a. & b. Correct and wrong way to connect the MEC and the connector tube |
A4. Final check
| Pay special attention to the foreskin of an uncircumcised male and make sure the foreskin is returned to its natural position. | Failure to return the foreskin can lead to swelling and possible constriction. |
| Check for proper size and adhesion of the MEC. | To prevent any complications in case of misfitting. |
| If necessary, to avoid pressure marks or if the penis retracts during micturition (emptying the bladder), the remaining rubber ring behind the adhering area can be removed by cutting or tearing the rim while the MEC remains adhered. [8,43] | Be careful that the skin is not damaged (special scissors are available). Fig. 54. Cut the rim  |
Appendix B. Patient’s teaching procedure for applying MEC
B1. Preparation
| Intervention | Rationale |
Gather the following items: o Waterproof pad or bath towel o Bowl of warm water, soap, washcloth, and hand towel o Correct size of MEC (small, medium, large, extra large) o Velcro, tape, or other type of sheath holding material o Urine bag with tube |
B2. Procedure
| • Wash your hands and your penis with soap and water. Rinse and dry your penis carefully. | To avoid cross contamination. |
| • Inspect your penis. | To ensure that it does not have any broken or reddened skin. |
| • Gently roll the MEC over your penis. Leave 2-5 cm of the MEC at the end of your penis. | To create enough space between the penis and tube. |
| • Wrap the sheath holder around the MEC at the base of your penis. Do not wrap the sheath holder too tightly because this may stop blood from going to your penis. | To prevent hair from becoming caught in the adhesive. |
| • Connect the MEC to the tube of the urine bag. | To ensure continent urine drainage. |
| • If you are using a small leg bag, use the catheter leg strap that came with your kit to secure the urine bag to your leg just below your knee. Leave some slack in the tube so the catheter will not be pulled when you move your leg. | To prevent disconnection of the tube from the drainage bag. |
| • The urine collection bag must be placed so that your urine flows downward. If you are in bed, you may attach the collection bag to your bed under the mattress. If you are sitting in a chair, you may attach the urine bag to the chair below the cushion you sit on. |
Source: Virtual labs media library http://virtuallabs.stanford.edu/
Appendix C. Troubleshooting
Monitor and note any difficulties that may occur when using MEC. If there are any problems, act according to local policy/protocol. Identification and management of problems are essential when caring for patients with MEC and their caregivers.
Most of the problems which occur using MEC are handling and instruction problems.
| Problem | Possible reasons | Possible solutions |
| Pressure sore at the penis shaft | MEC is too small | Select a larger size MEC |
| Pressure from the rim is too strong | Select a different product with shorter length | |
Cut the rim with special scissors Fig. 54 Cut the rim 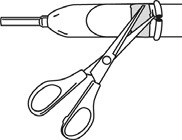 | ||
| Pressure from the adhesive stripe/tape is too strong | The adhesive stripe/ tape should not be glued in a circular pattern, but in a spiral pattern | |
| Pressure sore at the foreskin | Pressure from the MEC is too high due to e.g. an erection | Unroll the urinary sheath 4-6 cm to ensure that there is sufficient space between the foreskin and the tip of the MEC |
Leg bag drainage problems - disruption of urine flow | The MEC is trapped beneath the elastic trim of the under garment Clothing is too tight | Select more loose fitting clothes |
| The tube is too long or kinked | Check the tube | |
| The leg bag is not secured properly | Check the leg bag for security and position | |
| The leg bag is not positioned correctly | Replace the drainage bag | |
| The leg bag contains air | ||
| The urine is cloudy | • Check for infection • Check fluid intake • Check pH of the urine | |
| Leakage of the MEC | MEC does not fit well | Measure again and select the correct size |
| The adhesive glue is not sufficiently effective | Use more adhesive glue Use a different brand of adhesive | |
| The adhesive and the MEC material are not compatible (glue does not stick to the catheter) | Use compatible material | |
| Technique used to apply adhesive is incorrect | Practise technique on a model first | |
| Hairs may be caught between the MEC and the skin - thereby producing small leakages | Remove the hair | |
| The connecting tube keeps slipping away from the MEC | Choose compatible materials Roll the connecting tube a little further over the tip of the MEC for more security | |
| Air in the urinary bag | Never allow air to enter the leg bag through the outlet tap | Always leave a small amount of urine in the bottom of the bag. This increases the suction in the system (creating a partial vacuum) which helps drainage and prevents build-up of urine in the buffer zone of the urinary sheath |
| Skin irritation or sores | Sensitivity / allergy to skin care products or material | Test an alternative product on a neutral area of skin; e.g. inside the wrist, to ensure there is no allergic reaction |
| Prolonged use of adhesives | Replace MEC with one made of different material. Use a different brand of adhesive - before use, test on a neutral area of skin | |
| Talcum powder | Use MEC containing no talcum powder | |
| Allergic skin reaction | Latex sensitivity or allergy | Use talcum powder-free MEC as well as latex-free MEC |
| Skin too damp | MEC was applied too soon after a bath or shower | Ideally, wait at least 15 minutes after a shower or a bath before applying the MEC |
| Skin abrasions, fungal infections | ||
| Urinary tract infection | Check that urine can flow freely, tube is not kinked Do bladder scan to see if any residual urine | Patient education, inform on the mechanism of UTI development and provide clear instructions on the hygienic aspects involved in using MEC |
| Low fluid intake | Increase fluid intake | |
| MEC replacement interval is more than 24 hours | Replace more often | |
| MEC does not stay in place | Redundant or hyper-mobile prepuce | After consultation with a doctor and the patient, circumcision may be a consideration (will apply to long-term usage) |
Appendix D. Flowchart MEC - Urinary bag decision tree
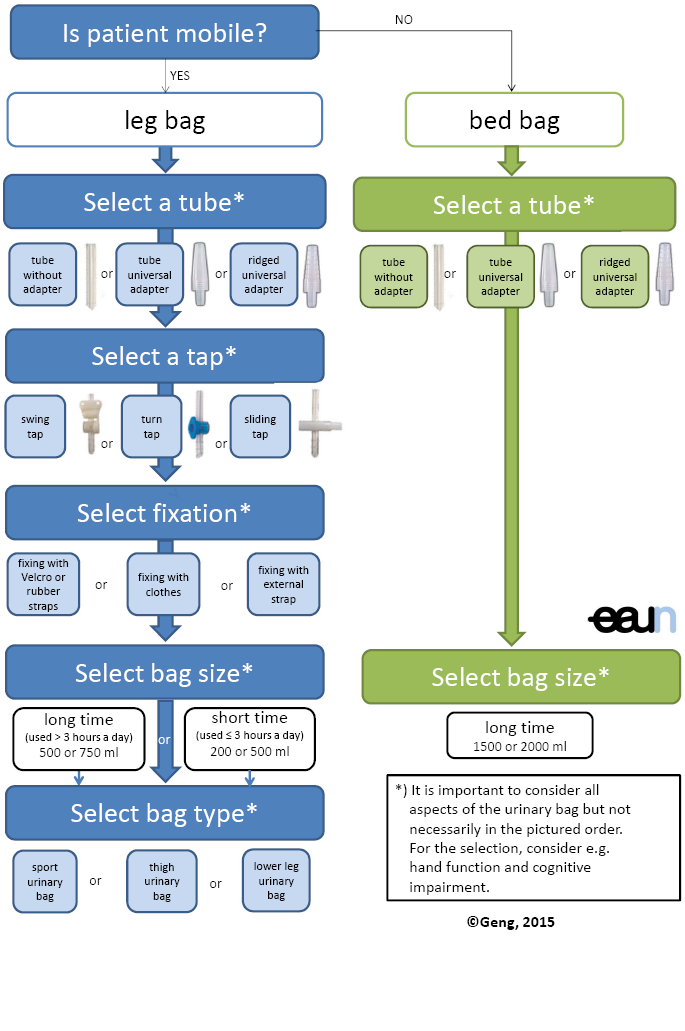
Figs. 32. Tube without adapter, 33. Tube with universal adapter, 34. Tube with rigid universal adapter and
Figs. 35. Swing tap, 36. Turn tap, 37. Sliding tap
(Source: Manfred Sauer GmbH)
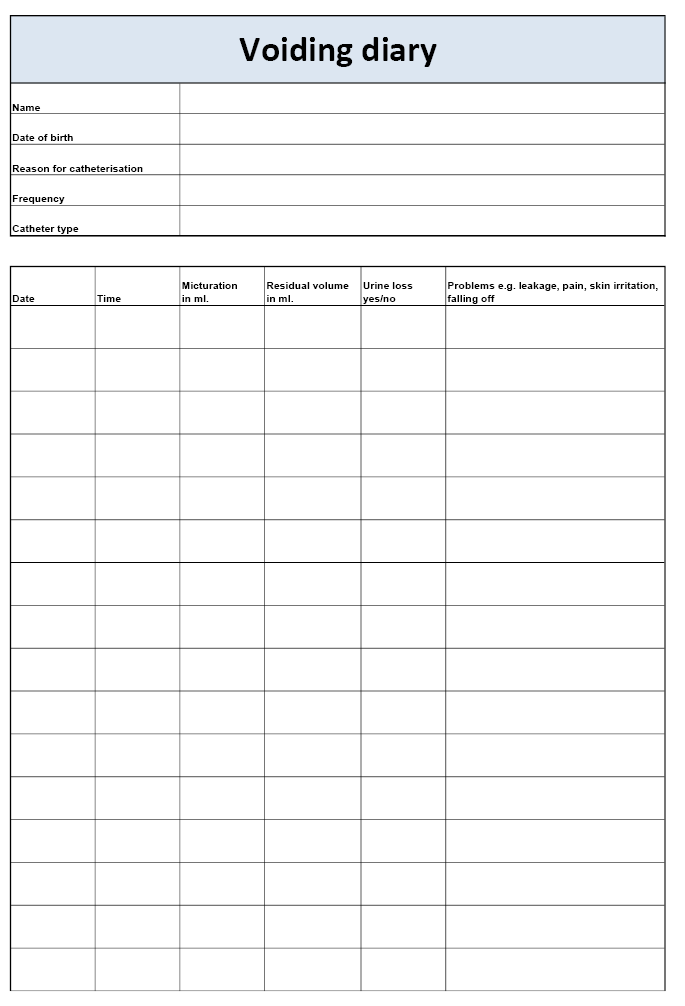
Appendix E. Voiding diary
Please inform the patients if they do not have to fill out all columns.